Saturday, 2 March 2013

Let the Painting Commence

To begin we set up our easels in a position around the structure and using our fingers as a viewfinder we selected an area of the structure and sketched some quick thumbnails like this:

 
Then cutting our sheet of card into an appropriate square and mixing our three primary colours and adding some white where needed to create our three tones that we were to work with, we started blocking in our painting which looked like this:
 
 
We had to be sure to work from background to foreground. Then we were to add different tones to the painting where they fell on the structure and eventually have something along the lines of this:


Painting (Elective 2)

The first two days of the painting elective were made up of exercises such as blind painting and painting with credit cards which were good exercises to get into working with paint. Here are some pictures of the kind of set up I had for painting with the credit card.

 
The day after, Wednesday we were given the task to set us a structure in both ends of the studio using items we had brought in of the colour we had been assigned! Here is the structure we set up:


Finished Pieces

I loved the whole process of raku and really like the pieces and how it is so unpredictable how a piece may turn out. I love the contrast that can be left between glazed bits and unglazed bits that are affected by the smoke.

Unfortunately my memory key has had a hiccup and I will have to photograph them again and repost them here on Monday :) ----watch this space----

Cleaning of the Naked Raku Piece


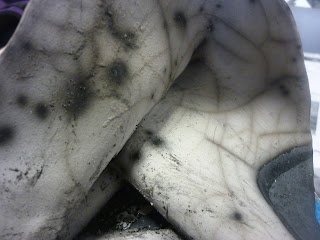
The coating that covers a naked raku piece chips off almost like egg shells


When all the shell is chipped away the piece still has to be cleaned with a sponge or so, the colour lifts and looks very impressive


I love the dotted effect the smoke left on my piece its very unusual and different which is what I love about the raku process

And here is some more... RAKUUUUUU

 The smoking chambers mid smoke
 The pieces on fire before more saw dust is poured on top and the lids placed over to smoke for 30 mins.
 The pieces are covered in a coating from the smoke and have to be cleaned
Here is one of my own pieces having been removed from the smoking chamber

More Raku


Then the kiln has to be packed ->


The kiln is opened while the pieces are still at firing temperature. Using a tongs the pieces are removed from the kiln and placed into the smoking chambers where saw dust is poured over them, lids are placed on the bins and left for 30 mins.
 

Raku

We learned about the raku process, which I really enjoyed! Here are some of the images from the process: Below is the process of glazing and also an image of the smoking chambers that are used for when the pieces come out of the kiln


Glazing

I loved doing the glazing process as it gave me a chance to individualise my piece from anyone else's. I wanted to use my ink drawings as a reference and take aspects of them into my ceramic pieces and so here is the piece. I had previously thrown this pot on the wheel.


Inked Up

We started doing some ink drawing to reflect our pieces and to maybe inspire future pieces and designs. I enjoyed doing this and in return the drawings helped inspire one of the pieces I made for the raku firing!


Ceramics Pieces

Decided on some of the shapes and designs I wanted to work with I got started making these pieces so here are some of them: